ILE CiCd - Part 4 - Ci Build
This is part 5 of a series of posts for ILE local development with VSCODE, the Code4i extension, and Gitlab Ci. Our previous post discussed RPGLE linting.
Well, you’ve made it. This is part 5 of our series on ILE CI/CD programming with Gitlab, and this is where things get interesting. We will start using Gitlab as more than just a code repository, and start looking at the CI / CD automation it offers. Before we begin, I should mention that this same approach can be accomplished with other CI/CD products like Jenkins, Github, etc. We will focus on Gitlab in this post.
💡Note It is recommended that you create a service account that is only used by Gitlab Ci to access your IBM i LPAR. For this tutorial, I’m just using my regular PUB400.COM account, and you can too if you are just doing this for learning.
💡Note In your organization, there are likely firewall rules that will need to be adjusted in order for this to work with your IBM i. You likely have an on premise or cloud based instance of Gitlab that will need to be able to contact your IBM i partition(s) over your SSH port (usually port 22). You might have strict firewall rules in your production partition, and less strict rules you for your development partition. If that is the case, you may continue and worry about production later.
About Gitlab
GitLab’s approach to CI/CD, or Continuous Integration/Continuous Deployment, is an iterative method of software development. It involves continuously building, testing, deploying, and monitoring code changes to reduce the chance of developing new code based on buggy or failed previous versions.
The process starts with a .gitlab-ci.yml file at the root of your project, which contains the configuration for your CI/CD pipeline. This file defines the tasks you want to complete (like testing and deploying your application), dependencies, caches, and the commands you want to run.
Runners, which are agents that run your jobs, can operate on physical machines or virtual instances. These runners load the image, clone your project, and run the job either locally or in the container. In this example, we will use a virtual runner provided by Gitlab.com that uses SSH to run its pipeline commands over an SSH encrypted connection to an IBM i partition.
Pipelines, made up of jobs and stages, define what you want to do, such as testing code changes or deploying to a staging environment1. Our CI step will include building our ILE programs, testing them, storing them in a package (a save file package), and finally deploying the package. CI/CD variables help customize jobs by making values defined elsewhere accessible to jobs.
An important note about Gitlab Security
🔥🔥🔥
The following instructions involve the potential to expose very sensitive authentication information - specifically, the SSH private key to your IBM i lpar. A bad actor with this information can run arbitrary commands on your partition, so special care must be taken. Please make sure you know what you are doing, even when your Gitlab instance is behind a firewall.
Here is some required reading:
- Gitlab permissions and roles
- Gitlab pipeline security
- Using Vault secrets in a CI job
- IBM i CHROOT containers
You should make sure that proper roles are set up in your Gitlab instance, so that only the appropriate people have maintainer and owner access to the settings of your groups and projects. Often this involves Active Directory groups - most organizations with on premise Gitlab will make use of Gitlab’s integration with AD. Gitlab also has group level, role based security, so you can define and secure variables at a higher ‘group’ that is maintained by users with a higher security role, while regular developers maintain access to the settings of the project within that group.
Also make sure you are utilizing traditional IBM i object-level permissions. DO NOT set this up with a user that has *ALLOBJ authority.
While it is the author’s opinion that Gitlab Ci with SSH can be utilized in a safe and secure way, the author takes no liability if utilizing any of the following instructions results in or contributes to any damages done by a bad actor to your system. Again, the author assumes no risk should you choose to continue.
🔥🔥🔥
Creating a skeleton for our build job
We will start by creating a .gitlab-ci.yml file in the root directory of our project. This file contains all of the commands and instructions for our runner to run.
To start, we will set up the SSH connection between the Gitlab runner and the IBM i only. The job code for the build, test, deploy, etc will come later. This is one of the more complicated pieces of the pipeline, because we want to make sure that our SSH connection to the IBM i is secure. It will utilize the 2 way authentication and encryption that SSH provides, but to do so we must set up some things.
/.gitlab-ci.yml
# ######################################################################################################
# IBM i Ci/Cd
# ######################################################################################################
# Gitlab Ci variables
#   IBMI_ADDRESS - The DNS or IP address of the IBM i partition
#   IBMI_USERID - The IBM i service account / user ID with ability to SSH to your partition
#   IBMI_SSH_PORT - The IBM i's SSH Port.  Usually '22', but PUB400.com has it as '2222'.
#   SSH_KNOWN_HOSTS - Run ssh-keyscan on your local machine to get the public key values from
#                     the IBM i and store it as the SSH_KNOWN_HOSTS variable in Gitlab CICD settings.
#   SSH_PRIVATE_KEY - Run SSH-KEYGEN to generate a private / public key pair for Gitlab to use.
#                     The public key must be installed on the IBM i as an AUTHORIZED_KEY
#                     The private key must be base64 encoded and set as SSH_PRIVATE_KEY in
#                     Gitlab CI variables.
#######################################################################################################

image: alpine:latest # tell gitlab.com what linux image to run on.

stages:  # List of stages for jobs, and their order of execution
  - build

before_script: # Global script that runs before each job
  - apk update && apk add openssh-client bash
  - eval $(ssh-agent -s) # run ssh-agent

  # Base64 decode SSH_PRIVATE_KEY and add it to the SSH agent store
  - bash -c 'ssh-add <(echo "$SSH_PRIVATE_KEY" | base64 -d)'
  - mkdir -p ~/.ssh # Hidden directory for ssh config

  # $SSH_KNOWN_HOSTS was output from 'ssh-keyscan -p 2222 pub400.com'
  - echo "$SSH_KNOWN_HOSTS" > ~/.ssh/known_hosts

build-job:
  # This job runs in the build stage, which runs first.
  stage: build
  script:
    # ssh commands here
    - echo "Compiling the code with SSH and Bob..."
    # Single line command to connect and run commands over SSH
    - |
      OUTPUT=$(ssh -p ${IBMI_SSH_PORT} ${IBMI_USERID}@${IBMI_ADDRESS} bash << ENDSSH1
        echo "Connection was successful")
      ENDSSH1
      )
      Check Output
      # echo "$OUTPUT"
      case "$OUTPUT" in
      *'successful'*)
        echo "Build Successful"
        ;;
      *)
        echo "Build Failed"
        exit 1
        ;;
      esac
    - echo "Build job complete."
There are a fair amount of comments at the top of the yaml code that explain what variables are required in order for the code to work. These are Gitlab Ci variables that we need to set up in the Gitlab UI before our pipeline will work. Read through the other comments and see if you can understand what is going on. Please make a comment at the bottom if you have questions.
Its worth mentioning that this bash script contains what is known as a Here Document. Its the bit of code that occurs between the ENDSSH1 delimiters. When you run commands over SSH as we are doing here, there is only a single argument to the SSH command that can contain a single line of code. By using a Here Document, we can pass in an entire formatted bash script as the argument. There are complications with variable expansion that we will get into later.
🔥 Note: Once you have added the .gitlab-ci.yml file in the root of your project, this signals to Gitlab to initiate a pipeline whenever you push your code to it. If you do see failed pipelines in gitlab.com, no big deal - you can ignore or delete failed pipelines. Any pipelines will continue to fail until we set up the important ci variables discussed below.
Gitlab Ci Variables You Say?
A Gitlab Ci Variable is just a bit of information that is stored in an environmental variable. The value can be provided at run time, or specified in the Gitlab UI for the project. We are going to store them in the Gitlab UI.
Its worth mentioning again, that if you are using your organization’s Gitlab instance, these variables should be properly secured, so that only the appropriate roles have the ability to view or update them.
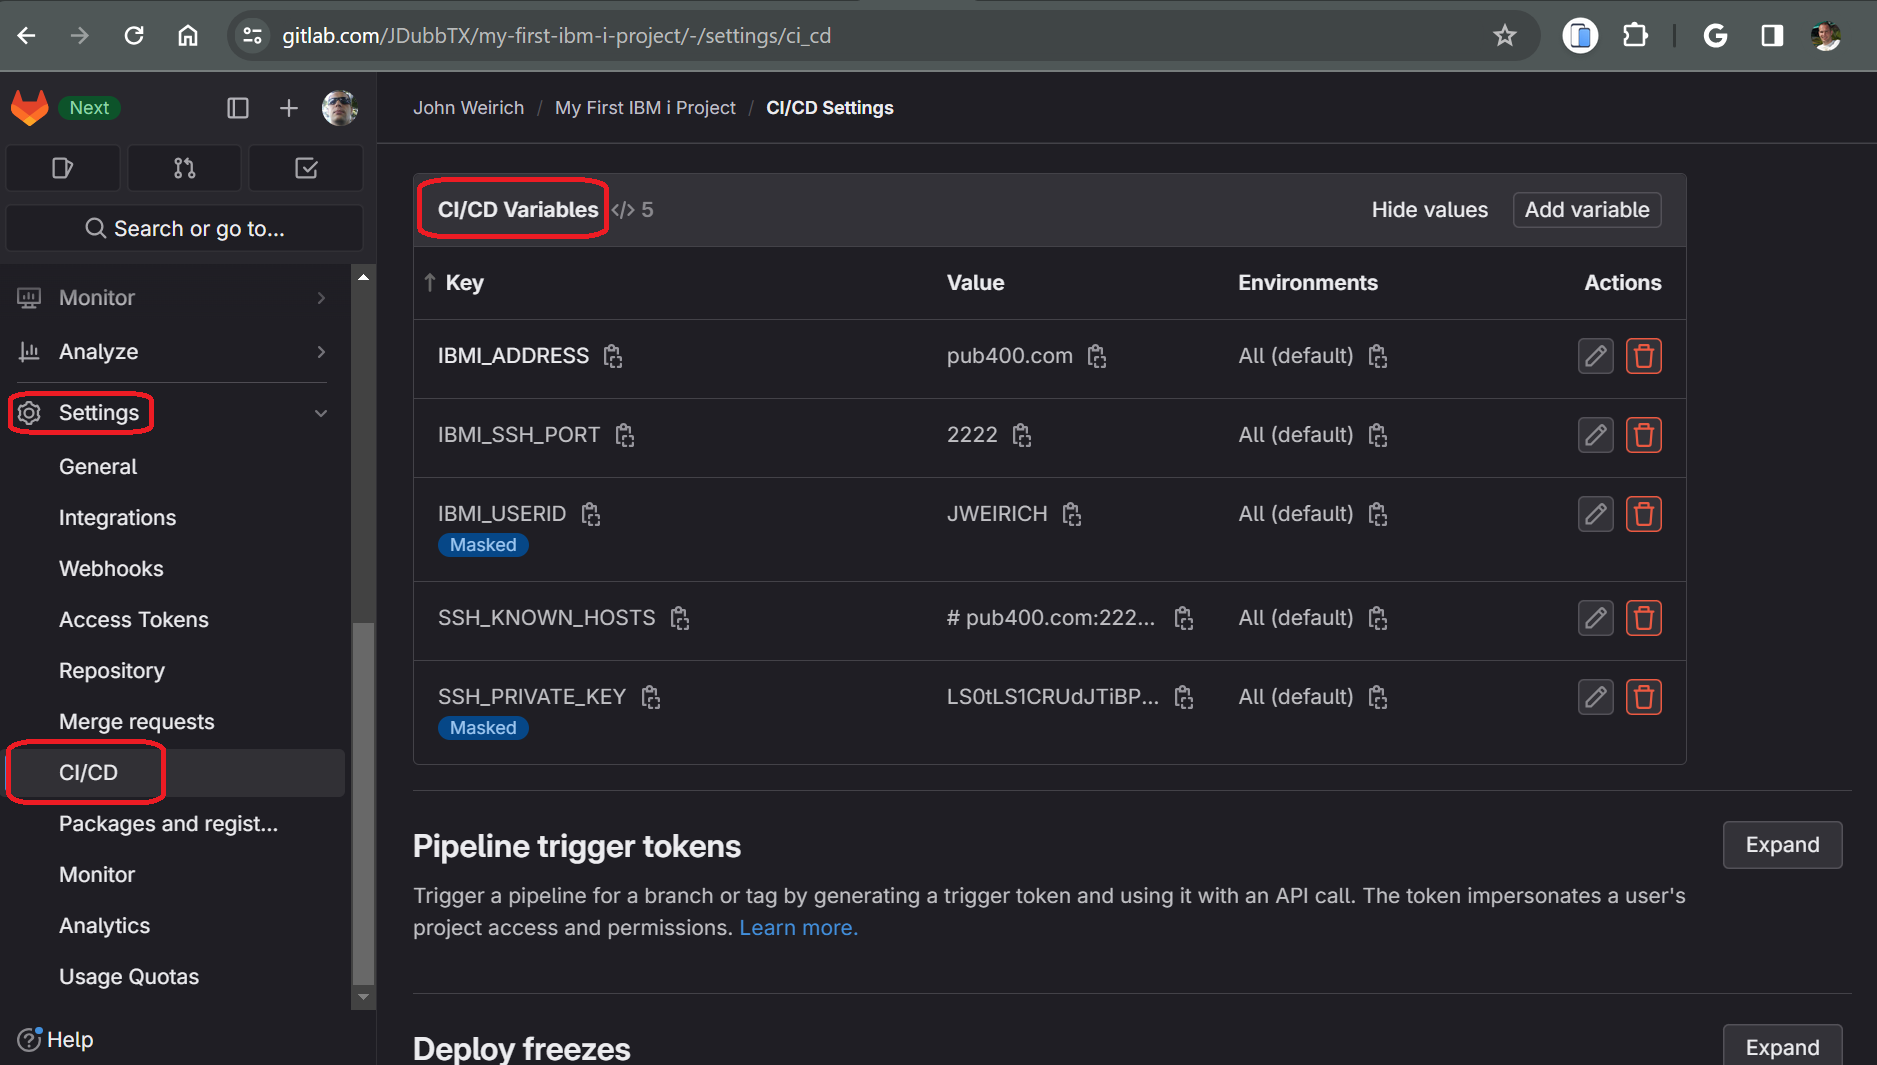
Gitlab Ci Variables
Start on the home page of your project in Gitlab.
- Click on settings (preferably in a higher level group that contains your project)
- Click on CI/CD under settings
- Expand Variables
- Click Add Variable
- Type: Variable (default)
- Environments: All (default)
- Flag settings
- ✔️ Protect Variable
- ✔️ Mask Variable ⬅️ especially important for SSH_PRIVATE_KEY
- ❌ Expand variable reference
- Enter key/value pairs as follows
- IBMI_ADDRESS
- Enter the DNS or IP address of the IBM i partition where the source will be built
- IBMI_USERID
- Enter the User ID that will be used to build the objects. Must have ability to SSH to the partition.
- IBMI_SSH_PORT
- Enter 22 for the standard SSH port, or whatever is required. On PUB400 it was changed to 2222.
- SSH_KNOWN_HOSTS
-
Go back to your WSL/Ubuntu bash prompt and use the **ssh-keyscan** command to get the public keys for the IBM i partition. The port portion of the command can be omitted if your IBM i partition uses the standard SSH port 22.
ssh-keyscan -p 2222 pub400.com❗ Important: Copy the entire output of the above command and save it in the SSH_KNOWN_HOSTS variable.
- SSH_PRIVATE_KEY
-
🔥 Important: Make sure you check the Mask Variable flag when setting this variable in the Gitlab UI. Although we are base64 encoding this value, its a trivial task to decode it by any would-be attacker. Remember, base64 encoding has NOTHING to do with security.
This will be the private key portion of a new private/public SSH key pair. We need to generate the new pair for Gitlab to use.
Start from your WSL/Ubuntu command line.
-
Run the following command to generate a new ssh key pair. We don’t want replace your existing key, so we won’t use the default key name and of id_rsa.
`ssh-keygen -f ~/gitlab_key` -
Hit enter, take the defaults, and do not enter a passphrase when prompted. The new ssh key pair will be named gitlab_key and gitlab_key.pub in your home directory.
-
Run the following command, which will base64 encode and display the private SSH key you just generated.
cat ~/gitlab_key | base64 -w0 -
Copy the output of the previous command - this will be the value you paste in the Gitlab Ci variables for SSH_PRIVATE_KEY
-
When all four Gitlab Ci variables have been defined, it should look like this:
The final setup we need to do is to install the SSH Public Key that we generated in the last step to the IBM i partition.
Run this command in your WSL/Ubuntu bash prompt, using the correct port number, user id, and address for your IBM i partition. Again you can omit the -p 2222 part if your IBM i partition uses the standard SSH port 22.
ssh-copy-id -i gitlab_rsa -p 2222 jweirich@pub400.comRunning your first pipeline
By default, Gitlab pipelines will run whenever new code is pushed to Gitlab on any branch. We will refine these rules later, but for now lets save and commit our work, then push our commit to Gitlab. This will trigger our pipeline in Gitlab. For now, our pipeline does nothing except establish an SSH connection to the target IBM i partition.
- Save any unsaved changes in .gitlab-ci.yml
- Commit those changes on your working branch
- Push the commits to Gitlab
- Go to Gitlab and see if the pipeline was successful and make sure there are no secrets displayed in the log.
Add Bob to the Build
Now its time to have the pipeline use Bob to build our project on the IBM i.
Modify your .gitlab-ci.yml code as shown in the Diff below
# ######################################################################################################
# gitlab.com shared runners
# ######################################################################################################
# Variables you must set in Gitlab CiCd variables
#   IBMI_ADDRESS    - The DSN or IP address of the IBM i partition
#   IBMI_USERID     - The IBM i service account / user ID.  User have ability to SSH to your partition
#   IBMI_SSH_PORT   - The IBM i's SSH Port.  Usually '22', but PUB400.com has it as '2222'.
#   SSH_KNOWN_HOSTS - Run ssh-keyscan on your local machine to get the public key values from
#                     the IBM i and store it as the SSH_KNOWN_HOSTS variable in Gitlab CICD settings.
#   SSH_PRIVATE_KEY - Run SSH-KEYGEN to generate a private / public key pair.
#                     The public key must be stored on the IBM i as an AUTHORIZED_KEY
#                     The private key must be stored as the SSH_PRIVATE_KEY variable in
#                     Gitlab CICD settings
+#   ############      #################################################################################
+#   BUILD_DIR       - Required IFS Directory where the build will take place
+#   OBJECT_LIB      - Optional static build library.  If not supplied, a temp library will be created
+#
+#
#######################################################################################################

image: alpine:latest # tell gitlab.com what linux image to run on.

stages:  # List of stages for jobs, and their order of execution
  - build

before_script: # Global script that runs before each job
  - apk update && apk add openssh-client bash tar git # install prerequisites

  - eval $(ssh-agent -s) # run ssh-agent

  # add base64 encoded private ssh key stored in SSH_PRIVATE_KEY variable to the agent store
  - bash -c 'ssh-add <(echo "$SSH_PRIVATE_KEY" | base64 -d)'

  - mkdir -p ~/.ssh # Hidden directory for ssh config

  # $SSH_KNOWN_HOSTS was output from 'ssh-keyscan -p 2222 pub400.com'
  - echo "$SSH_KNOWN_HOSTS" > ~/.ssh/known_hosts

build-job:
  # This job runs in the build stage, which runs first.
  stage: build
  script:
    # ssh commands here
    - echo "Compiling the code with SSH and Bob..."
    # Single line command to connect and run a series of commands over SSH
    - |
      OUTPUT=$(ssh -p ${IBMI_SSH_PORT} ${IBMI_USERID}@${IBMI_ADDRESS} bash << ENDSSH1
+        cd ${BUILD_DIR}
+        export objlib=${OBJECT_LIB:-G#${CI_COMMIT_SHORT_SHA}}
+        echo "objlib=\${objlib}"
+        echo "PATH=\$PATH"
+        rm -rf *
+        git clone --branch ${CI_COMMIT_REF_NAME} ${CI_REPOSITORY_URL}
+        cd ${CI_PROJECT_NAME}
+        if [[ -z \${objlib} ]]; then
+          export objlib=G#${CI_COMMIT_SHORT_SHA}
+          cl "CRTLIB \${objlib}"
+        else
+          echo "clearing \$objlib"
+          cl "CLRLIB \${objlib}"
+        fi &&
+        makei -v &&
+        makei b
      ENDSSH1
      )
      # Check Output
      echo "${OUTPUT}"
      case "${OUTPUT}" in
-      *'successful'*)
+      *' 0 failed'*)
        echo "Build Successful"
        ;;
      *)
        echo "Build Failed"
        exit 1
        ;;
      esac
    - echo "Build job complete."
More Gitlab Ci Variables
We have added 2 more Gitlab Ci variables that must be defined in the Gitlab UI.
- BUILD_DIR
- Enter the IFS directory where you want the code. Bob will use this directory to build our project.
- OBJECT_LIB
- Optional library name for Bob to know where to build the objects. If you don't specify a library name, a temporary library will be created via `CRTLIB` command.
Go ahead and commit and push your work. This time when you go to your build pipeline in Gitlab you should see the output from Bob building your objects:
Running with gitlab-runner 16.6.0~beta.105.gd2263193 (d2263193)
  on blue-5.saas-linux-small-amd64.runners-manager.gitlab.com/default -AzERasQ, system ID: s_4cb09cee29e2
  feature flags: FF_USE_IMPROVED_URL_MASKING:true
Preparing the "docker+machine" executor
00:05
Using Docker executor with image alpine:latest ...
Pulling docker image alpine:latest ...
Using docker image sha256:f8c20f8bbcb684055b4fea470fdd169c86e87786940b3262335b12ec3adef418 for alpine:latest with digest alpine@sha256:51b67269f354137895d43f3b3d810bfacd3945438e94dc5ac55fdac340352f48 ...
Preparing environment
00:01
Running on runner--azerasq-project-50735122-concurrent-0 via runner-azerasq-s-l-s-amd64-1705802937-48274240...
Getting source from Git repository
00:01
Fetching changes with git depth set to 20...
Initialized empty Git repository in /builds/JDubbTX/my-first-ibm-i-project/.git/
Created fresh repository.
Checking out 0dc49766 as detached HEAD (ref is main)...
Skipping Git submodules setup
$ git remote set-url origin "${CI_REPOSITORY_URL}"
Executing "step_script" stage of the job script
00:18
Using docker image sha256:f8c20f8bbcb684055b4fea470fdd169c86e87786940b3262335b12ec3adef418 for alpine:latest with digest alpine@sha256:51b67269f354137895d43f3b3d810bfacd3945438e94dc5ac55fdac340352f48 ...
$ apk update && apk add openssh-client bash tar git
fetch https://dl-cdn.alpinelinux.org/alpine/v3.19/main/x86_64/APKINDEX.tar.gz
fetch https://dl-cdn.alpinelinux.org/alpine/v3.19/community/x86_64/APKINDEX.tar.gz
v3.19.0-305-ge031d9be776 [https://dl-cdn.alpinelinux.org/alpine/v3.19/main]
v3.19.0-312-g47761aa9b27 [https://dl-cdn.alpinelinux.org/alpine/v3.19/community]
OK: 22982 distinct packages available
(1/20) Installing ncurses-terminfo-base (6.4_p20231125-r0)
(2/20) Installing libncursesw (6.4_p20231125-r0)
(3/20) Installing readline (8.2.1-r2)
(4/20) Installing bash (5.2.21-r0)
Executing bash-5.2.21-r0.post-install
(5/20) Installing ca-certificates (20230506-r0)
(6/20) Installing brotli-libs (1.1.0-r1)
(7/20) Installing c-ares (1.24.0-r0)
(8/20) Installing libunistring (1.1-r2)
(9/20) Installing libidn2 (2.3.4-r4)
(10/20) Installing nghttp2-libs (1.58.0-r0)
(11/20) Installing libcurl (8.5.0-r0)
(12/20) Installing libexpat (2.5.0-r2)
(13/20) Installing pcre2 (10.42-r2)
(14/20) Installing git (2.43.0-r0)
(15/20) Installing openssh-keygen (9.6_p1-r0)
(16/20) Installing libedit (20230828.3.1-r3)
(17/20) Installing openssh-client-common (9.6_p1-r0)
(18/20) Installing openssh-client-default (9.6_p1-r0)
(19/20) Installing libacl (2.3.1-r4)
(20/20) Installing tar (1.35-r2)
Executing busybox-1.36.1-r15.trigger
Executing ca-certificates-20230506-r0.trigger
OK: 25 MiB in 35 packages
$ eval $(ssh-agent -s)
Agent pid 23
$ bash -c 'ssh-add <(echo "$SSH_PRIVATE_KEY" | base64 -d)'
Identity added: /dev/fd/63 (jweirich@LAPTOP-97G89Q4N)
$ mkdir -p ~/.ssh
$ echo "$SSH_KNOWN_HOSTS" > ~/.ssh/known_hosts
$ echo ${BUILD_DIR}
/home/JWEIRICH/projects/temp
$ echo ${CI_REPOSITORY_URL}
https://gitlab-ci-token:[MASKED]@gitlab.com/JDubbTX/my-first-ibm-i-project.git
$ echo ${OBJECT_LIB}
JWEIRICH2
$ echo "Compiling the code with SSH and Bob..."
Compiling the code with SSH and Bob...
$ OUTPUT=$(ssh -p ${IBMI_SSH_PORT} ${IBMI_USERID}@${IBMI_ADDRESS} bash << ENDSSH1 # collapsed multi-line command
*********************************************
* WELCOME TO PUB400.COM - your public IBM i *
* ----------------------------------------- *
* Please take note of the following:        *
* - all access is logged                    *
* - please be polite and do not disturb     *
*   other users!                            *
* - this system is of limited support       *
* - see https://pub400.com                  *
*********************************************

-> Enter your password for Logon below:
Cloning into 'my-first-ibm-i-project'...
objlib=JWEIRICH2
PATH=/home/JWEIRICH/projects/ibmi-bob/bin:/QOpenSys/pkgs/bin:/QOpenSys/usr/bin:/usr/ccs/bin:/QOpenSys/usr/bin/X11:/usr/sbin:.:/usr/bin:
clearing JWEIRICH2
CPC2199: Library JWEIRICH2 cleared.
Bob version 2.4.23
> /QOpenSys/pkgs/bin/make -k BUILDVARSMKPATH="/tmp/tmpio_86eu9" -k BOB="/home/JWEIRICH/projects/ibmi-bob" -f "/home/JWEIRICH/projects/ibmi-bob/src/mk/Makefile" all
=== Create ILE CL Program [MYCL]
/home/JWEIRICH/projects/ibmi-bob/src/scripts/crtfrmstmf --ccsid *JOB -f /home/JWEIRICH/projects/temp/my-first-ibm-i-project/qcllesrc/mycl.pgm.clle -o MYCL -l JWEIRICH2 -c CRTBNDCL -p "AUT() DBGVIEW(*ALL) OPTION(*EVENTF) TEXT( ) TGTRLS() INCDIR(*NONE)"
✓ MYCL.PGM was created successfully!
=== Creating DTAARA from [MYDTAQ.DTAARA]
CRTDTAQ DTAQ(MYDTAQ) MAXLEN(20)
✓ MYDTAQ.DTAARA was created successfully!
=== Creating DSPF [MYDSPF.DSPF] in JWEIRICH2
/home/JWEIRICH/projects/ibmi-bob/src/scripts/crtfrmstmf --ccsid *JOB -f /home/JWEIRICH/projects/temp/my-first-ibm-i-project/QDDSSRC/MYDSPF.DSPF -o MYDSPF -l JWEIRICH2 -c CRTDSPF -p "ENHDSP(*YES) RSTDSP(*YES) DFRWRT(*YES) AUT() OPTION(*EVENTF *SRC *LIST) TEXT( )"
✓ MYDSPF.FILE was created successfully!
=== Create Bound RPG Program [MYRPGLE] in JWEIRICH2
CRTBNDRPG srcstmf('/home/JWEIRICH/projects/temp/my-first-ibm-i-project/qrpglesrc/MYRPGLE.PGM.RPGLE') PGM(JWEIRICH2/MYRPGLE) DBGVIEW(*ALL ) OPTION(*EVENTF ) TEXT(' ') INCDIR(*NONE) TGTCCSID(*JOB)
✓ MYRPGLE.PGM was created successfully!
Objects:             0 failed 4 succeed 4 total
Build Completed!
Build Successful
$ echo "Build job complete."
Build job complete.
Cleaning up project directory and file based variables
00:00
Job succeeded
Merging your code
You should be able to log into the IBM i with a 5250 terminal or over SSH now and confirm that your objects are in the build library. Once you have confirmed this, its time to merge your branch to main and create a tag.